Tuesday, September 25, 2012

Tercio de Castille

Most of my Castillan force for Maurice are in white uniforms. Not only is this easy to do in this scale, but it's also a pretty striking color:


I haven't decided on a name for the Regimental Colonel but he likes his fancy uniforms. He pays for them so he gets to wear what he wants.


I've added flags to all my finished units. They're random, but nobody will notice. 


They've also got personalized license plates. 

The Tercio de Castille is the only Spanish infantry unit in the whole force that's Trained; the others are Conscript. That's not gonna last, though. 

Monday, September 24, 2012

From the Archives: Imperial Mashup

So the lads were talking about the old 40k Tallarn Rough Riders, and I mentioned that I have a test model from a project that was both conceived and abandoned long ago (though not in a galaxy far away). I still have the necessary Cold Ones and Tallarn Riders for a squad of these, but they'll remain stowed away in a dusty box for the forseeable future.


This is a straight up kitbash, basically just the Tallarn horse rider reposed with pliers and pinned to a Dark Elf Cold One. 


The rider doesn't even fit that well on his mount, though these photos hide it well.  I remember being pretty pleased with the paint job on the lizard but now the painting just looks rudimentary to me.


The only custom element are the reins, made out of Green Stuff. I'm amazed they've survived intact after all this time.

So what do you think. Should I continue to include old painted stuff as part of my blog?

Saturday, September 22, 2012

Hibernia, Unflagged

This summer, our local gaming group has started to play Sam Mustafa's Seven Years War game 
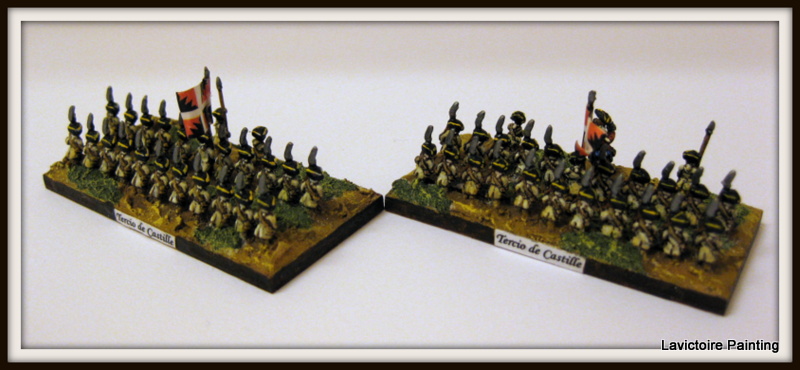
Maurice. Despite some issues I have with the rules, I remain charmed by its use of cards to randomize events, and most importantly by the little 6mm dudes we're all using. I've been slowly chopping away at my own pile of wannabe Spaniards and here's my first effort.


The Hibernia Regiment is one of several regiments of Irish mercenary soldiers in Catholic European service. The Marquis of Castille la Vieja has hired these foreigners to stiffen the mass of conscripted recruits that make up the bulk of his infantry.


Each unit is represented by two 6x3cm bases, a holdover from an older rules set which allows for each base to be a little diorama in 6mm.


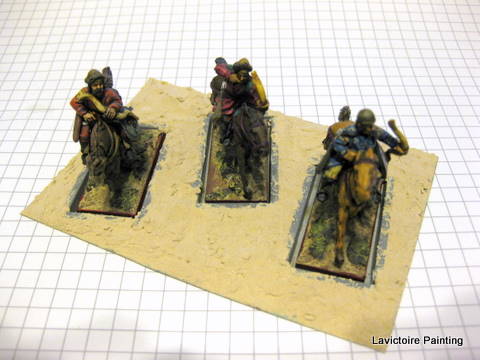
I've added a mounted Regimental officer to one base, an idea I borrowed shamelessly from one of my clubmates.


As the bases are textured in wood filler, it was easy to press a die into one corner to make a little recess, so I can track the unit's disruptions right on the base.

To be honest I'm not terribly pleased with the results, given the work it's taken so far. But it's my first efforts in this scale in 20 years - hopefully subsequent units will look a little nicer.

Friday, January 27, 2012

Haqqislam WIP


Normally I don't like to post 'Work In Progress' shots but I offered to assemble a friend's Haqqislam force to help kickstart him into the game, and he agreed. Here they are!

I threw them over bases textured with some gridded plasticard I had kicking around.

As usual, they're pretty nice figures. I love the Muyibs; their helmets remind me of Zhodani from the old GDW Traveller role-playing game. And the Feuerbach dude's armor is really nicely detailed, with lots of overlapping plates and ventilation details. But I like them all, and hope to one day add a few to my own collection.

Monday, January 23, 2012

How To: Impetus Sabot Bases for 25mm Gaming


This is an Impetus Light Cavalry base made by saboting four 40x60mm DBx LH bases together. Awesome figures aside, it looks kind of regimented, a little stodgy, and is super expensive with 8 figures crowded together. 


This is the same LC base using a movement tray. The figures have room to skirmish, and there’s also room to admire the loving attention I lavished on each one. Furthermore, one pack of Perrys equals one base in this standard. Same base: nearly ⅓ the price.

So how did I get from before to after?

Fortunately, back in the last century when I first bought my 25mm Turks, I had the foresight to base them individually, anticipating just such a possibility. Since all my figures are based on the same 20x40mm magnetic bases, it’s easy to create nice looking diorama display bases for them. In this post I’ll show you how.

Materials


I had an idea that I wanted very tidy base holes on my sabot, but couldn’t figure out what to use as a walling material to keep the base texture from spilling over into the holes. I finally hit upon the idea of using spare plastic sprue: I have a ton kicking around, since I never throw anything out, and fortuitously they are the exact same height (3mm) as the saboted bases. I also got my friend Jahan to cut me some 6x12cm steel rectangles for the sabots themselves (thanks Jahan!)

You’ll also need:

-Wood Filler or other base texture
-Carpenter’s Glue
-Tool for spreading filler
-Sprue Cutters

1. Cut ~43mm and ~23mm lengths of sprue to make enough base holes. Precision is not necessary. I want some overlap so that the outside of the hole is also a rectangle. I did a batch while watching a movie with my wife, much to her annoyance.

2. Arrange the figures on the base.
Fit the sprue around the figures, moving the figures to ensure that there is enough room for the sprue! If you want more figures on a base you may have to make a double or triple box to ensure there’s enough space for everybody. A close fit isn’t necessary here, and in fact a looser fit is preferable to give yourself a little wiggle room when emplacing and removing the figures. 


Glue the sprue onto the sabot using Carpenter’s glue. Taking care not to shift the sprues, remove the figures to make sure you don’t unintentionally glue the figure to the base as well.  Leave to dry.


3. Fill the spaces around the sprue rectangles with the texturing material of your choice. I chose to be pretty sloppy on the first pass, and will do detail filling once they are dry.


The finished base, ready for painting and flocking. Too easy! :)